Academic Support Other Learning Technologies
Select your tool below for support resources, how-tos, and more more information.


Zoom Resources
Getting Started with Zoom Meetings
Scheduling Zoom Meetings
Learn how to schedule meetings in Zoom.
Add the Zoom plugin to Outlook to add Zoom meetings to Outlook calendar events.
Zoom Features
Learn more about screen sharing.
Review instructions for recording.
To organize groups, learn how to manage breakout rooms.
Zoom Lifecycle Policy
The Zoom Software Quarterly Lifecycle Policy requires updates to Zoom software 4 times a year. Zoom requires software to be up to date to host and join meetings.
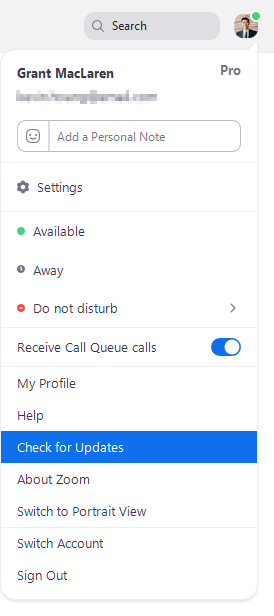 For personal devices, ensure you have the most up to date version of Zoom by selecting your profile image in the top right of the Zoom window. Select Check for Updates.
Note: Zoom on Langara devices may be slightly behind in version number, but will still work to host and join meetings.
To update Zoom on Langara Windows devices, open Software Centre and select Updates.
To update Zoom on Langara macOS devices, open Langara College Self Service and search for "Zoom".
Microsoft Forms Resources
How to Access Microsoft Forms
If your instructor wants you to complete a Microsoft Form, they will provide you with a link or QR code to the form or embed the Form directly in Brightspace or PebblePad.
Depending on how the Form was setup, you may need to login using your Langara email and password to complete it.
Accessing Completed Forms
To review Forms you have previously submitted and saved:
- Navigate to Forms through your Microsoft 365 account.
- Select the Filled Forms tab.
- Saved forms will appear.

Forms Support
If you cannot access or have issues completing a Form, please contact your instructor.
For information on creating Forms, consult Create a form with Microsoft Forms and Microsoft Forms Quick Start Guide.
Forms Accessibility
Microsoft Forms works with assistive technology and is considered a highly accessible platform. To take full advantage of Forms accessibility features, consider Use Immersive Reader in Microsoft Forms and Screen reader support for Microsoft Forms.
For more information or questions about using Forms with assistive technology or creating accessible content, email assistivetech [at] langara.ca.
Using Padlet
How to Access Padlet
Some Padlets allow users to anonymously contribute and engage without signing in. For more information, read about creating anonymous posts.
Padlet's can be accessed via:
- QR code
- An email invitation
- Link
- Bightspace or PebblePad
For more information, read joining padlets.
However, depending on the instructor and activity, you may need a Padlet account. If so, instructors will request a Padlet student account for you and you will receive an email with instructions on how to activate and access the account.
Note: Your Padlet account and data will be retained for 2 years from the year of activation. Your account and data will be deleted at the end of April in year two. Student accounts created in 2024 will be deleted at the end of April in 2026. If you wish to retain a copy of your work, please export your content.
Create a Post
To create a post on a Padlet:
- Click the + button on the bottom right or double-click anywhere on the Padlet.
- Complete the required fields marked with an asterisk.
- To add an attachment, click the ellipsis (…).
- Choose the desired attachment type.
- Click Publish to add your post to the Padlet.
For more, read Add a post to your board.
Edit a Post
Posts can be edited if you are the author of the post or the Administrator of the Padlet. To edit a post:
- Click the vertical ellipsis button (…) the top-right corner of a post.
- Select Edit and the post will enlarge and become editable.
- Click Update to save your changes.
For more information, learn how to edit a post.
Padlet Accessibility
Contact EdTech and inform your instructor know if you are experiencing issues using Padlet. Consult this Padlet Accessibility Guide for best practices for creating and using Padlet.
Troubleshooting Padlet Issues
I cannot login to Padlet
- Verify that your course instructor requested a Padlet account for you. You should have received an email from Padlet to your mylangara email address with your username and password.
- Check your Junk email folder to ensure you did not miss the email.
- Contact your instructor letting them know you cannot login to Padlet.
For more information, read Log in and out of Padlet and Wrong password in the Padlet Knowledge Base.
I want to change my password
Refer to change my password.
I want to receive fewer notifications
Review Notifications settings.
I shared my Padlet but people cannot see the content
Ensure your Visitor permissions are set up correctly. Consult Share a padlet help for more information.
Padlet blocked by Langara College
You cannot use a Langara assigned Padlet account to interact with padlets created by non-Langara accounts. This is done to protect student privacy.
If you try to access a Padlet and receive the message "Blocked by Langara College Sorry, Langara College doesn't allow students to access padlets outside the school" log out of your Padlet account and re-try. You should be able to contribute anonymously or may need to create a separate padlet account.
I cannot create arrows to connect posts
Linked posts can only be created in the Freeform or Map Format. You can change your padlet Layout in the Settings menu. Refer to Customization Options above for more information. Read How to add arrows to connect posts for more information.
Additional Support
For more resources and answers, search Padlet help.
Creating a Padlet
How to Create a Padlet
For step-by-step instructions, please review the slide show below:
Recommended Padlet Settings
We recommend that students limit the option for others to remake (or copy) their Padlets. Remaking a Padlet allows others to copy the entirety of the Padlet including any personal details and information in posts.
To deactivate remakes of padlets:
- Go to the Settings menu (the cog icon on the right side of your padlet).
- Move to the Content section.
- Under Remakes change from Everyone to Admins only.
Padlets can be customized in various ways.
- Title or Description under Heading.
- Wallpaper, Colour scheme, Font, or Post Size under Appearance.
- Padlet Format or how posts are organized under Layout.
- How people interact with my posts, such as allowing comments and changing reaction types, under Engagement.
- The visibility of authorship and customize post fields under Posts. Learn more about Post fields.
- The Moderation of posts (whether posts need to be approved before being visible) and who can make a copy of your Padlet.
- For more information, refer to Padlet settings menu help.
Share your Padlet
By default, your Padlet is private. You will need to change the Visitor permissions before others can see and interact with your Padlet. To change sharing permissions:
- Access the Share menu by clicking the arrow icon on the right-hand side of your padlet.
- Change Visitor permissions from No Access to Reader, Writer, or Moderator to allow others access to your padlet. Review Share a Padlet help to best understand how different permission settings change how visitors interact with your padlet.
- Share your padlet using a link or a QR code. You can present your padlet as a slideshow or embed your padlet into Brightspace, PebblePad, or any another site that supports embed codes.
Padlets can also be embedded in web pages, such as Brightspace, PebblePad, or WordPress. To embed your padlet:
- In the Share menu, click Embed in your blog or website.
- Choose which form of your padlet you wish to embed and copy the appropriate embed code.
Note: If you choose to embed a slideshow, you can adjust the size of the embed and choose whether you want the slideshow to autoplay.
To embed a padlet in Brightspace, review the following slideshow:

Equatio Downloads
Add the Equatio extension for Chrome or Edge to read and create digital math on the web.
Download Equatio for macOS or Windows.
Equatio is also available in Brightspace in the Insert Stuff menu.
Equatio Resources
Getting Started with Equatio
Visit the Equatio Academy for immersive resources and support for using Equatio.
Consider the following video for a brief introduction to using Equatio:
For more resources, reivew Equatio FAQ and the EquatIO chapter of the Accessibility Handbook for Teaching and Learning.
Equatio in Brightspace
Access Equatio in Brightspace anywhere the HTML editor is present. Find Equatio in the Insert Stuff menu.

Equatio allows users to type math as plain language or using LaTeX as well as enter math using handwriting or dictation. The toolbar also includes a fully accessible graphing tool.
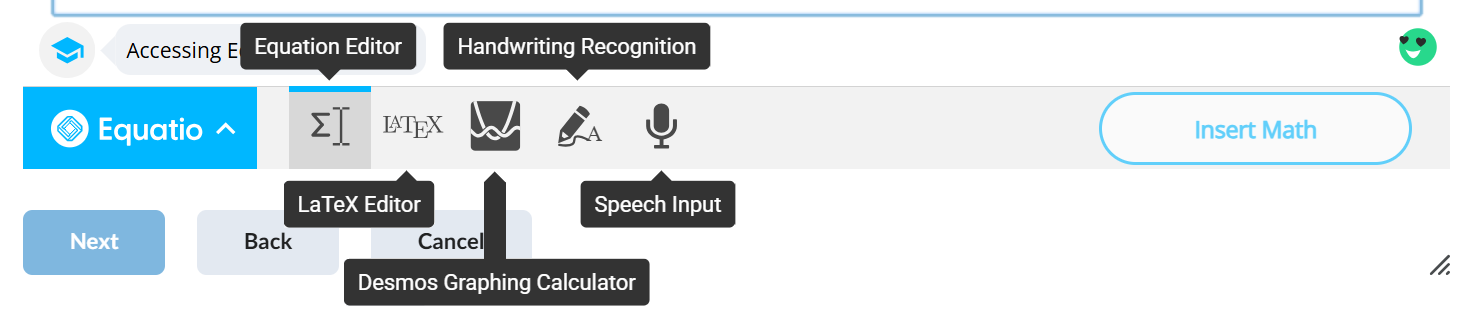
Once you have created math, select Insert Math to add it to your work.
Note: Equatio is not a calculator and does not solve equations.
The following video demonstrates how Equatio can be used in Brightspace Quizzes.
The following video demonstrates how to use Equatio to submit Assignments in Brightspace. Equatio can only be used in Text Submission Assignment types which is determined by your instructor.

WordPress has two main content types – posts and pages – and many other features such as commenting, linking, tagging, and RSS feeds. WordPress allows sites to have multiple users to edit or contribute content collaboratively.
OpenETC (or opened.ca) is a shared platform for WordPress available to BC educators and students for free. Sign-up and site creation is quick and easy. Sign up for an OpenETC account to get started and create or import a WordPress site.
If you have existing content on another WordPress instance, learn how to export a WordPress site and how to import WordPress site content.
Return to Student Learning Technology home to explore other tools.
Have questions?
Email online-student-support [at] langara.ca (online-student-support[at]langara[dot]ca)
